Pages

Saturday, October 31, 2020

Tim Holtz Wicked Card ~ Happy Halloween!

My final of 5 Halloween tags created with Tim Holtz Distress Oxide inks, stamps, ephemera and embellishments.  This one also has a raven die cut. Instead of the bat stencil I used the chevron part of the stencil. I layered this tag over some Graphic 45 paper and black magic mesh. The final touch are fibers for the tag. 


I used a Graphic 45 spell bottle stamp on this tag.  I sprayed and splattered shimmer spray after stamping and stenciling but prior to adding the paper elements.


Ingredients:
Tim Holtz Halloween 2 Stamp and Stencil (chevron)
Graphic 45 Steampunk Spells stamps 1
Distress Ink Black Soot
black paper
manila tag
ribbons and fibers
Shimmer spray ink
texture paste
 Perfect Pearls and Pearl Ex Interference Blue and various colors in texture paste
Tim Holtz Sizzix Movers and Shapers Mini Cat and Raven
Tim Holtz Idea-ology Halloween Ephemera and Snippets
Black magic mesh
Graphic 45 6x6 paper


Thank you for stopping by

Alicia

Friday, October 30, 2020

Tim Holtz Fortune telling card

The holiday is getting closer, Halloween is my favorite time of the year.  This card starts with a small tag I made in a group.  You can see my large tags herehere and .  This one begins with the same black soot and purple hued distress oxide inks.  I stenciled with texture paste the skulls.  Since this tag was small enough I decided to add it to an A2 card.  I used my brand new Recollections Green Witch paper stack as background paper.  I added all of this to a black shimmer card base.


The embellishments I used here are so much fun!  Most are Tim Holtz that I also purchased recently.  However, the bingo markers are a reclaimed thrift store purchase.


I am not sure of the origin of the hand but it works great here.  I added plenty of pearls and bling.


Ingredients:
Distress Oxide inks: Wilted Violet, Dusty Concord and Black Soot maybe Seedless Preserves
Distress ink Black Soot
Skull stencils
texture paste
 Perfect Pearls and Pearl Ex Interference Blue and various colors in texture paste
Tim Holtz Idea-ology Creepy Eyes. Halloween Ephemera and Snippets
manila tag
fiber
Shimmer spray ink
gems and pearls
misc embellishments, bingo marker, hand
Recollections Green Witch paper
black shimmer card base

I would like to enter this in the following challenges:


Thanks so much for stopping by!

Alicia


Wednesday, October 28, 2020

Tim Holtz Idea-ology Tag

 Today I have the final of 3 Distress Ink Idea-ology large tags I created.  I purchased the Tim Holtz Idea-ology Ephemera and Bones recently and was very excited to play with them.  This is the only tag I did not use the texture paste/stencil combination.  I left this one a bit more flat but the bones have a real dimension.  I also added three black gems to the spider for a body.


Ingredients:
Tim Holtz Sizzix Movers and Shapers Mini Spider
Distress Oxide inks: Wilted Violet, Dusty Concord and Black Soot maybe Seedless Preserves
Distress ink Black Soot
Skull stencil
Tim Holtz Halloween 2 Stamps
Tim Holtz Idea-o-logy Halloween Boneyard
Tim Holtz Idea-ology Creepy Eyes. Halloween Ephemera and Snippets
black paper
manila tag
ribbons and fibers
Shimmer spray ink
gems

I would like to enter this in the following challenges:


Thank you for stopping by today.

Alicia

Tuesday, October 27, 2020

RIP card for Atlantic Hearts Sketch Challenge

It's my turn once again at Atlantic Hearts Sketch Challenge.  I love working with sketches.  This is actually the first Halloween card I made this season.  When I saw this sketch and the date, I immediately thought Halloween!  I wound up using a lot of spare parts from my Halloween stash.

First I needed a background and this time I decided to use Distress ink to create a spooky foggy look instead of my go to patterned paper.  Despite my love of designer paper, I do love a great CAS card.


Here's the sketch:


Ingredients:
Tim Holtz Sizzix On the Edge Graveyard die
Karen Burniston Halloween scene dies
black, white and silver glitter card stock
Distress Oxide inks:  Black Soot and Hickory Smoke
gems

I would like to enter this in the following challenges:


Don't forget to play along with Atlantic Hearts Sketch Challenge

Atlantic Hearts Sketch Challenge

Happy Halloween and thanks so much for stopping by

Alicia

Monday, October 26, 2020

Creative Memories Sports Finish Strong for Bitten By the Bug 2

Welcome to the latest challenge from Bitten By the Bug 2.  Our challenge this time around is sports.  I created a layout of a half marathon my son ran last year.  He finished first in his age division. I must say I did not take any of these photos.  I borrowed them from the internet.  They were featured on the race website and the local news.


I used the negative cut from page 2 as a stencil for page 1.  I simply sponged some distress ink and held in place with my hand.  I was NOT that concerned with precision.  


I manipulated the layout of the title.  It was a square with the shoe as part of the design.  I used the shoe in the lower left.  


I made a duplicate of the title and contoured only the shoe to create a stripe of color in the sole.


The second page was actually the first page I created.   I loved the Finish Strong title available with Cricut Access. 


 I also made a duplicate of this title and contoured the runner.  I cut the second runner out of the background paper in a spot that I knew would be covered by the badge mat.


Ingredients:
Cricut Finish Strong, Marathon Motivation and Stork's Delivery
Creative Memories Sports Paper Stack and Sticker pack
Black shimmer and white card stock
Tutti Small Scallop Stitched Circles
Our Daily Bread Designs Pierced Circle die 
Hickory Smoke Distress ink

I would like to enter this in the following challenges:


Thank you for stopping by and don't forget to play along with Bitten By the Bug 2 Sports theme for the next two weeks.

Alicia


Lawn Fawn Today the World Revolves Around You

 Hello readers, Alicia with a Lawn Fawn card.  I love these cute little images.  I have so much fun coloring them.  I also enjoy creating Distress Oxide backgrounds.  Together, I spent a lot of time creating the elements before combining them all on my galaxy card.  


I had so much fun coloring images that I make dozens of pieces in one sitting.  I stamped as many images from Lawn Fawn Out of the World stamps and Lawn Fawn Beam me Up stamps as I could fit on my piece of paper.  I used a stamping platform to stamp the sheets multiple times and heat emboss.  I colored them with various alcohol markers and finally die cut them several at a time to "mass produce" elements.


A tip to make the transition between clouds and space smooth is to add the cloud layer first them die cut the outside shape with the pieces together. I also illustrate in the photo below layering of the twine.  First I adhered one end to the astronaut with pop dots.  Next I added the other end to the back of the space layer with double sided adhesive.  I trimmed the excess off the back.  Finally, I added a drop of glue to create the curve of the twine in the manner I desired.  


I used gold shimmer spray on top of the Distress Oxide background after I had spritzed with plenty of water to create the soft chalk appearance. I felt the gold brought out the Distress Oxide Fossilized Amber layered underneath the Black Soot.  I also played up the yellow with a soft yellow soft card base, yellow sequins and a yellow planet in my assortment.


In addition to the following Dies R Us products, I used Colorbox black pigment ink, Judikins black detail embossing powder, Judikins Diamond Glaze, alcohol markers, gold shimmer spray, sequins, twine with glossy black, yellow, and white card stock.

Lawn Fawn Out of the World stamps


Don't forget to come join in the fun at the Dies R Us Challenge Blog.  There's a new challenge theme offered on the 1st and 15th of each month and one lucky randomly drawn winner will receive a gift voucher prize to the Dies R Us Store.  For your convenience, all the important Dies R Us links are provided below.


Tuesday, October 20, 2020

Tim Holtz Witchy Tag

Hello, I am back with another Distress Oxide tag.  I used the same ink colors as last time and continued to use the texture paste I tinted with Perfect Pearls and Pearl Ex and the bat stencil.  However, after that this tag switched is up with some witches and moon die cut.


I splattered with shimmer mist before adding the metallic silver moon die cut and witches.


I stamped and embossed the sentiment.  The die cut picked up some of the embossing around the edges.


I added some metallic fiber, rick rack and sheer ribbons.  It's hard to determine but I sprinkled this tag with some tiny black sequins.


Ingredients:
Tim Holtz Sizzix Movers and Shapers Moon die
Distress Oxide inks: Wilted Violet, Dusty Concord and Black Soot maybe Seedless Preserves
Graphic 45 Steampunk Spells stamps 1
Versamark Ink
Eggplant Metallic embossing powder
Tim Holtz Bat Stencil
texture paste
 Perfect Pearls and Pearl Ex various colors in texture paste
Tim Holtz Idea-ology Halloween Ephemera Paper Dolls 2
metallic paper
manila tag
ribbons and fibers
Shimmer spray ink
sequins


Thank you for reading today

Alicia


Monday, October 19, 2020

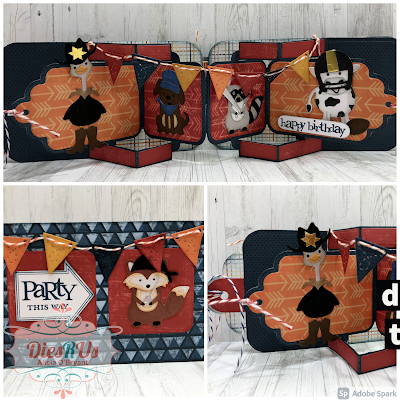
Party This Way! Karen Burniston Tag Pop Up with critters for Dies R Us

 Hi there.  It's Alicia and it's been a few years but I have joined the DT again.  I am so excited to bring you my first project!  I created a tag pop up book as a birthday card for my nephew.  I am sure the pop up will be sure to thrill him as I hope it does you.  With the assistance of Karen Burniston assembly videos, these kinetic cards really go together quite easily for a wow factor that wasn't a lot of work.


The real work was in designing all the animals included in his card but they are just so darn cute!  I got carried away making these little guys.  I am sure you will see more Karen Burniston critters from me on future projects.  I own a few sets but not all of them yet!


I had to "fussy" cut the sheriff's badge for the ostrich's hat.  I could not for the life of me find anything that tiny to use.  I am sure there is something in the Dies R Us Store. I will eventually find it!  I added an extra strip of color to the football helmet.  I die cut the center section with a scrap of gold to get that perfect rounded edge.  Then I simple cut the sides to create a strip and adhered. Also of note, I used colored card stock for all the critters but not the cow.  I used white card stock and colored the details with markers.


The most important step is to only place adhesive on the ends of the pop up assembly and adhere to the tag base.  If you get adhesive on any of the pop out portion your card will not work correctly.


As I assembled the project, I continuously checked with each piece that it worked properly.  Stringing the banner was the most delicate part of this process.  Once all the inside pieces were in place, I added the front panel and tied pieces of twine in the holes of the tags.


The following is a list of Dies R Us Store products I used. In addition I used Stampin Up stamps, ink and punch for the sentiments, twine, markers, card stock and Quick Quotes designer papers.

Karen Burniston Tag Book


Karen Burniston Tiny Accessories 1

Karen Burniston Tiny Accessories 3


Don't forget to come join in the fun at the Dies R Us Challenge Blog.  There's a new challenge theme offered on the 1st and 15th of each month and one lucky randomly drawn winner will receive a gift voucher prize to the Dies R Us Store.  For your convenience, all the important Dies R Us links are provided below.


click below for:
FRIENDS OF DIES R US PINTEREST PAGE

Thank you for stopping by!

Stay Healthy! 

Stay Safe!

Thanks for stopping by today

I would like to enter this in the following challenges:


Thanks for stopping by!

Thursday, October 15, 2020

Tim Holtz Toxic Tag

I spent an entire weekend inking up and getting messy on some manila and kraft tags.  This one is my husband's favorite.  I started the projects with a layer of Distress Oxide inks.  I used a couple of purples and black soot to cover the base.  I spritzed with water to create the chalky effect.  I thought it made the perfect spooky background.


The next layer was stenciling with regular Distress ink. I can't remember the brand of the blood and small skull stencils.  I layered some ephemera next.


The next layer was texture paste mixed with Pearl Ex Interference Blue and a large skull stencil.  It didn't color the paste too much.  So for the bats I added some black and platinum to the paste.  Next I sprinkled some black shimmer spray to grunge it up a bit more. Then those eyes!  When I was opening the package my husband saw them and thought they were super cool.  It was his idea to used two different colors.  The package of Tim Holtz eyes don't have any two the same size and same color. There are three sizes in each color.  So if you want pairs by two packs.


I added some black bat die cuts and a silver metallic skull die cut.  The final touch was some ribbon and fibers.  And of course, inking the edges with black ink for a cohesive dark look.


Ingredients:
Tim Holtz Sizzix Movers and Shapers Mini Bat and Skull
Distress Oxide inks: Wilted Violet, Dusty Concord and Black Soot maybe Seedless Preserves
Distress ink Fired Brick and Black Soot
Tim Holtz Bat stencil
Skull stencils-NBUS
texture paste
 Perfect Pearls and Pearl Ex Interference Blue and various colors in texture paste
Tim Holtz Idea-ology Creepy Eyes. Halloween Ephemera and Snippets-NBUS
black  and metallic paper
manila tag
ribbons and fibers
Shimmer spray ink

I would like to enter this in the following challenges:


Thank you for stopping by and stay tuned I made a few of these lovelies for the season!

Alicia