Tuesday, October 30, 2018

Sunflower Thank You with Atlantic Hearts Challenge Sketch

Hello and welcome to this week's Atlantic Hearts Challenge sketch inspiration.  I created a very special thank you card.  I began with a sunflower photograph that I captured and printed.  I then dug out my sunflower die.  It is a bit time consuming to put this flower together but I believe the end result was worth it.


Here's this week's sketch


I cut all the petals and leaves.  I inked all the edge 


I shaped and sculpted the pieces with a stylus and foam.  You can purchase a foam mat for this purpose but I reuse pieces from brad packs.


After gluing the pieces of the flower together.  I glued down some of the center piece die cuts.  I added chunky brown glitter and let that dry.  I finally added  Judikins Rox to the center for a very textured multi layered flower.


I die cut the sentiment out of the same card stock as the sunflower petals.  I layered it on some dark green ribbon for a pop!


I always cut a writing mat for the inside of a dark card base.  I don't always add more decoration inside but the rest of this sentiment worked perfectly.


Here is a view from the side so you can see the dimension of the flower.


Ingredients:
Sizzix Susan's Garden Sunflower dies
Frantic Stamper Accessory Words 3 and Cut Corner Rectangle
misc papers
Judikins Rox
Chunky glitter

I would like to enter this in the following challenges:


Thank you for stopping by and don't forget to play along with us at Atlantic Hearts Challenge

Atlantic Hearts Sketch Challenge
Alicia

Monday, October 29, 2018

Frankenstein's Monster: Bitten By the Bug 2 Halloween Challenge

Good morning, it is time for a new challenge at Bitten By the Bug 2. This go round the challenge is Halloween.  How easy is that one?  Just create a project with your Cricut and use at least one Cricut image.  I have used Autumn Celebration cart to make Frankenstein's monster.


I used paper and added some embellishments from Creative Memories Hocus Pocus collection.  I thought the sign and window worked great for the scene.


I randomly placed the black glitter mosaic stones to give the illusion of an old stone building.  I used a large premade card base so to finish off the edges I used a black shimmer paper and some black fiber to soften the change from the purple CM paper.


Close up of my monster.  I used the light reverse side of a bright green shimmer paper for the eerie green effect.


Ingredients:
Cricut Cartridge: Autumn Celebration
Creative Memories Hocus Pocus paper, stickers and die cuts
Mark Richards Mosaic Mosaique Black Squares
misc papers
fiber

I would like to enter this in the following challenges:


Don't forget to play along for the next two weeks at Bitten By the Bug 2.


Thanks so much for stopping by today!

Alicia

Thursday, October 25, 2018

Trick or Treat with Quick Quotes papers

Halloween is nearing and I created a card for the holiday with a mix of Quick Quotes paper collectionsPowderpuff Chalking inks, and dies.  I also used a stencil and some embellishments from a past Club Q.  I love the versatility.  I have outlined the steps I used to create this card below along with some detailed photographs.

  • Use the die twice once for an orange cut and once for a green cut
  • Fussy cut vines from green cut and adhere to orange pumpkin cut
  • Ink all edges with Powderpuff Chalking inks
  • Adhere pumpkin border and vines to bottom edge of background
  • Insert embellishments inside pumpkins to create "luminaries"


Quick Quotes products:
Powderpuff Chalking ink: Midnight Confessions and Green Leaf

other products:
stamp by Stampers Anonymous Tim Holtz sentiment
ink by Colorbox Black
embossing  powder by Judikins Black detail
die cuts by Spellbinders Pumpkin accents


Thank you so much for stopping by


Wednesday, October 24, 2018

Wedding Certificate layout with Sketches in Thyme

I have a few final wedding layouts.  I was looking through my memorabilia and I still had my certificate.  I wanted to preserve it in my album. 


Here's the sketch from Sketches in Thyme #343 which I rotated.


I used this awesome silk and feather flower.


I used all kinds of gold and pale green embellishments.


Ingredients:
very old paper from my stash
Kiwi Lane templates
Prima bling and flowers
Recollections gems
various bling and a tassel 
Quick Quotes chalking ink

I would like to enter this in the following challenges:


Thanks so much for stopping by

Alicia

Sunday, October 21, 2018

Creative Memories Vintage Chic Reception layout

Today I have a page which I had previously created for a Creative Memories Virtual Crop.  I didn't get around to posting it until I completed the opposite page this week.


I used this sketch from the February Creative Memories Virtual Crop.


This is the Creative Memories sticker ribbon. It can be a pain to get all the little pieces out (like weeding a Cricut image) but the result is worth it.


A close up of my die cuts.


Ingredients:
Creative Memories Vintage Chic Power Palette
Spellbinders Jewel Alphabet and Phrases Set Two dies

I would like to enter this in the following challenges:


Thanks so much for stopping by!

Alicia

Saturday, October 20, 2018

Danger Zone Blog Hop


Welcome to the Danger Zone Blog Hop

This is a blog hop featuring projects inspired by the creepy, scary creatures of Halloween!

Connie Can Crop is the beginning of this "danger" filled hop! You should have arrived from

Shannon's blog but if not please start at the beginning. 

This is a one day blog hop, but you have until Sunday at 10pm to finish hopping and leaving your love for all of these talented crafters.


We have an awesome sponsor for this hop!!

Miss Kate Cuttables
One lucky winner is going to win their choice of 3 files!! 

What do you need to do to win? Easy... become  a follower of each of the fabulous blogs in this hop and leave each of them a comment letting them know what you like best about their projects.

You will have until 10 pm Sunday to finish the hop and leave your comments on every blog to be eligible to win. 
Winners will be announced on Wednesday 10/24/18 at Connie Can Crop.
Be sure to follow everyone and leave a comment along the way!


Here's what I have created for you.

I cut a multi layer Dracula using my Cricut and the Autumn Celebration cart.


I thought I would try something new and use a Wink of Stella pen with a stencil.  It did have an eerie effect, that doesn't ring true in the photos.


One last look at my guy.


Ingredients:
Cricut Cartridge:  Autumn Celebration
Graphic 45 Sentiment stamp
Colorbox Black ink
Judikins Black detail embossing powder
Tim Holtz bat stencil
Wink of Stella black pen
misc papers


Be sure to head over to Kim's blog


Here's our line up in case you get lost along the way.

Friday, October 19, 2018

Wedding Manicure layout

Hello, one more wedding layout.  This photo almost didn't get used but in the end I needed on more page and this fit in chronologically.  I found these card backgrounds I made with Judikins Mica gloss inks.  I also had several pieces of this pink paper and the Martha Stewart plaid came to mind when I thought of a plaid piece to use.  


Here is the sketch I used from Rochelle Spear's blog.  The twist is to use plaid which I did.


This tag is a sticker.  I used some netting to tie in the hole.


I found this kraft doily and some great fiber in my stash.  I believe it is from Hobby Lobby.


Ingredients:
Artsy.licious Fine Flocked paper in Bloom
Martha Stewart plaid paper
Recollections stickers, doily and pearls
Creative Memories sticker letters
The Paper Studio fiber
Judikins mica gloss and glossy card stock

I would like to enter this in the following challenges:


Thank you for stopping by!

Alicia

Wednesday, October 17, 2018

Beware with Atlantic Hearts Challenge sketch

Good morning and welcome to my creation for Atlantic Hearts Challenge sketch challenge this week.  I used my Cricut to create a spooky image.  I layered it on top of a manual cut die.  I inked all the edges and added a few tiny sequins.


Here's the sketch:


Ingredients:
Creative Memories Hocus Pocus 6x6 paper
Cricut cart: Autumn Celebrations
Spellbinders label twenty two die
misc papers
sequins

I would like to enter this in the following challenges:

http://fantabulouscricut.blogspot.com/2018/10/challenge-337-halloween.html until 10/28x

http://cardsinenvy.blogspot.com/2018/10/favorite-holiday-card-challenge.html until 11/4x

Thanks for checking out my inspiration today and don't forget to play along at Atlantic Hearts Challenge
Atlantic Hearts Sketch Challenge
Alicia


Tuesday, October 16, 2018

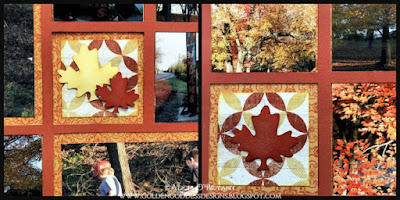
Fall Colors: Quick Quote October Club Q layouts

Hello, Alicia sharing my take on this month's Club Q.  I loved all the oranges, reds and gold in this month's kit.  I found the perfect pictures for the title from a hike in my local park.


To create this layout, I followed these steps:
  1. Open kit and punch out die cuts
  2. Color white die cuts with a ink, I choose Desert Sun PowderPuff Chalking Ink
  3. Ink edges of remaining die cuts
  4. Adhere layers together
  5. Arrange die cuts and photos on 12x2 designer paper
  6. After finalizing design, adhere all pieces


The second page uses the negative of a die cut page.  I had several photos of this fun trek to fill most of the squares.  In the spare squares I filled with paper and die cut leaves in the kit.


Here is a close up of the die cuts.  I inked the yellow leaf with Desert Sun.


With the leftovers I created a card.  While I chose to use the richer side of the paper on the layout.  I picked the softer side for the background of this card. Here are the steps I took. 
  1. Ink the negative from a leaf die cut
  2. Layer it on a leftover square
  3. Wrap a bit of ribbon around and used pop dots to lift off the card  
  4. Stamp the sentiment in Mango Mai Tai on leftover white chipboard
  5. Layer pieces on top of two layers of coordinating designer paper
  6. Layer on folder white card stock in size A2


Quick Quotes Products:
Powderpuff Chalking inks:  Desert Sun and Mango Mai Tai 


Thank you for stopping by today!