Thursday, February 25, 2021

Graphic 45 Card Making Class

Hello all, I designed the cards today to be made in a class I am leading at a boutique in Latonia, Ky on May 13 from 1-3.  You can find the Facebook Event page HERE.  You can find details about Local Studio 325 also on Facebook.  They carry my cards and jewelry all year round.  I feel lucky to host a class here.  Chris & Co have so many super cool classes going on, you can check out more events happening soon.

Here are the cards you will complete in my class using Graphic 45 papers and embellishments.


These two cards use a Kiwi Lane template and the negative!  I will show you how to get more bang for your buck!  They also feature stamping sentiments.


This card features stamping, die cutting and fussy cutting.  The dotted paper, dress and sentiment makes me think Disney.


You will learn to alter die cuts with scissors and bling!


We will use ribbons, brads, stamps, punches, tags, die cuts and pretty paper to complete five cards complete with envelopes and leftover product to make another card.


Participants will have some choice in sentiments, papers and embellishments.


Thank you for visiting and if you are local please think of attending my class.

Alicia

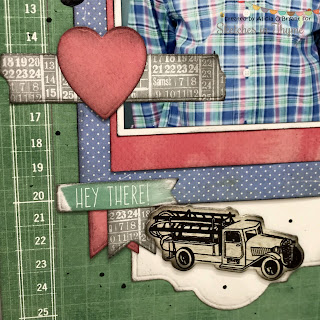
Drew's School Photo with Sketch in Thyme

 
It's time for the fourth sketch this month from Sketches in Thyme.   My favorite subject is my nephew.  I scrap these and send them to my SIL to add to her album.  This is his school picture from last year.


Here's the sketch:


I used a couple of packs of ephemera in the cluster. 


I fussy cut all those clouds from the cloud paper used for the tag.  The raisins are stickers from Creative Memories.  I used a pen to splatter dots around.


The square cloud is a tiny envelope.


I used some We R die cuts for most of the strips and heart using the same papers in the layout.  I cut the title using my Cricut and the same papers.


Ingredients:
Heidi Swapp Vintage Chic Bookkeeping paper (green background and grey numbers)
American Crafts Amy Tangerine Better Together paper (pink wash)
We R Farmer's Market Mason Jar (blue with white dots)
Little Yellow Bicycle Escape Above the Clouds (fussy cut clouds)
Basic Grey Hey Boy!  chipboard embellishments
Basic Grey Mini envelopes
Spellbinders label twenty-one die
We R Tape It die set
Stampin Up banner punch
Creative Memories tag bunch and stickers
paper twine

Thank you for stopping by and don't forget to play along with Sketches in Thyme.

Alicia


Wednesday, February 17, 2021

We R Fearless card for Atlantic Hearts Sketch Challenge

Hello, it's time again for another inspiration card from Atlantic Hearts Sketch Challenge.  I know it's simple, but I feel this is a good card to give my son on a whim.  I like it.  I love woodgrain and this has 3 different colors of it!


Here is the sketch:


Here's a closer look at my die cut sentiment.


Ingredients:
We R Memory Keepers 6x6 and 12x12 Happy Campers papers
Stamplorations Cutplorations word:  Fearless
Stampin Up punches: Banner pick a punch, Decorative Label punch
cream and brown card stock

Hop on over and play along with the Atlantic Hearts Sketch Challenge #408.


Thanks for stopping by

Alicia


Monday, February 15, 2021

Cricut Bon Appetit! food themed challenge at Bitten By the Bug 2

 It's time again for the Bitten By the Bug 2's Bon Appetit! Food Challenge. I decided to change it up and create a scrapbook page.  I think this photo is adorable.  I have no idea what he is making but I did my best to make a cute foodie layout.


This title was simple but cute with the layering.


I did cut this heart with a manual cutter.


I layered a tad bit of acetate for the "shine" of the eggs.


Ingredients:
Cricut images from When I was a Kid, Kitchen Supplies and From my Kitchen
Creative Memories printed paper and heart shaped cutter
acetate, metallic, kraft and misc paper

I would like to enter this in the following challenges:


Please join us for the Bitten By the Bug 2's Bon Appetit! Food Challenge until 3.1.21.
Thank you for stopping by

Alicia

Double Trouble's Crazy Cousin Layers Challenge

Hello, it's time again to be a Crazy Cousin for Double Trouble Layers Challenge.  This challenge is all about layers.  I tried a new fold and piled on the layers.

Here is my project.  Double Trouble asks that you tell them how many layers and trying to count, I believe there is more than 10!!  I die cut, inked, colored, stamped and fussy cut to create this scene.


Here are the details of the challenge. I added pearls to the center of the die cut flowers to comply with the twist.

My card began with this layer. I created the folds and determined what sides would "show" and inked those pieces up with Distress Oxide Bundled Sage.  The center was die cut with the vine die so it didn't need to be completely inked.  The center panel is 5.5"x5.5" to fit the vine die cut.


Here is a side view.  I watched a video but because I die cut the front instead of making that side the back I had to make it work with my changes.  I don't know that I would make it this way again.  


One tip I took from the video was to reinforce the front panel with extra layers.  I die cut another half sheet of the vines and glued it behind just off center to create a shadow.  The bottom is reinforced with a thin layer of die cut "grass". I also glued the die cut layer with the fairy and mushrooms directly on the front panel.  I layered a die cut and inked pieced of grass which was 1.5-2" in height.  I added a drop of glue to the fairy's leg to provide support from the taller grass layer.  I also stamped a mushroom cluster on that layer.


I used Distress Oxide Forest Moss on the next two layers.  I dusted all the layers with green shimmer ink before assembling the card.  The trees are die cut and embossed from the same set and inked with Forest Moss.  The are not sprayed with shimmer ink.  I stamped flowers on the first hill layer.  The two hill layers are opposite sides of the die cut.


I colored the die cut mushrooms and fairy with alcohol markers.  I used Spectrum Noir shimmer alcohol on the dress, wings and hair of the fairy.


The back of the shadow box is a sheet of paper from the kit.  I also cut the flowers and purple vine from printed paper.

Ingredients:
Crafter's Companion Build a Scene box including dies, stamps, pearls and papers
Distress Oxide inks
Spectrum Noir shimmer ink pens
alcohol markers

I would like to enter this in the following challenges:


Don't forget to join in the challenge over at Double Trouble Layers Challenge until February 28.  Thanks for stopping by.

Alicia

Alcohol Ink Background with Silver Foiling for Dies R Us

Hello dear readers. This was my very first attempt with Alcohol inks and yupo paper.  I admit the first time I tried alcohol inks I was not at all impressed with the result.  I also didn't own any yupo paper. I put them away for years.  I recently saw some of the lovely backgrounds, watched a video or two and decided my poor result previously was from not using ALL the appropriate supplies.  So I ordered yupo paper and a few new ink colors.  Needless to say I was much more impressed with the results this time around.


I used a very basic straw technique to move the ink around and didn't dilute them very much resulting in vibrant colors.  I also used scrap foiling on the slightly wet background to create the silver layer in the background. I simply burnished left over pieces over the top. When there is a lot of ink still not completely dried the foil sticks.


I layered my metallic cuts on black card stock cuts to strengthen the them and created a three dimensional effect.  I also cut and emboss to get all the details from the dies.


From the side you can see how the cuts pop on the surface and the beauty of all the silver foil highlights.


I used a Frantic Stamper stitched rectangle die that is no longer available to create my frame.  I linked a very similar Lawn Fawn Outside In Stitched Rectangle that you could use to create this same frame.  I used very strong tape to keep the alcohol ink background panel on the thin framed card.  I wanted to show off as much of the background as possible.


Dies R Us products used:


Sue Wilson Industrial Chic dies

other products used:
metallic silver and glossy black card stock
foil scraps
gems

I would like to enter this in the following challenges:


Don't forget to come join in the fun at the Dies R Us Challenge Blog. There's a new challenge theme offered on the 1st and 15th of each month and one lucky randomly drawn winner will receive a gift voucher prize to the Dies R Us Store. For your convenience, all the important Dies R Us links are provided below.


Monday, February 8, 2021

Sue Wilson Embossed Love card for Dies R Us

Hello, I have Valentine's/Love card today.  I had some great nesting square dies in from my Dies R Us stash and I thought I would mix and match for interesting layering.  I used velvet, metallic and textured card stocks for more interest.


I was really impressed with the beauty of the metallic paper embossed by the Sue Wilson die.  I took the small squares and placed them over the center rose in the heart die.  I taped them down for accuracy and embossed them in my Sizzix Big Shot.


I purposely turned them in various directions on the card.  I also cut the sentiment in the metallic.


Dies R Us Store products used:


Other products:
Velvet paper, metallic card stock, misc card stock
black ink for distressing

Don't forget to come join in the fun at the Dies R Us Challenge Blog. There's a new challenge theme offered on the 1st and 15th of each month and one lucky randomly drawn winner will receive a gift voucher prize to the Dies R Us Store. For your convenience, all the important Dies R Us links are provided below.